Using Action Labels in an Action Widget
Action Labels are specific labels that you can assign to any widget. These labels simplify managing complex tasks involving Action Widgets, such as hiding or displaying multiple containers simultaneously.
Key features
Flexibility: Assign the same label to multiple widgets or assign multiple labels to a single Widget.
Efficiency: Reduce the need for multiple Action Widgets or long action lists. For example, you can hide several containers with a single action.
Using Action Labels
Step 1: assigning Action Labels
You can assign Action Labels in two ways:
Option 1: assign Action Labels via the widget settings
- Open the Widget’s settings.
- Navigate to the Extras section.
- Enter your label(s) in the Action Labels field, seperate multiple labels with a space.
- Click Save and Exit.
- Repeat this process for each Widget you wish to label.
Option 2: assign Action Labels via the Action Widget
-
Open an Action Widget.
-
Open to edit either the WHEN, AND IF, or THEN section.
-
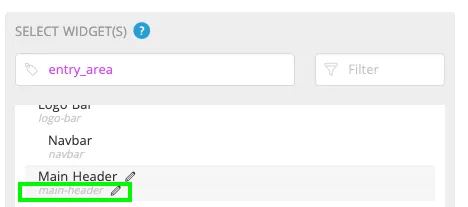
Hover your cursor over the Widget in the list, and click on the pencil icon for the light grey or purple text to edit the Action Label.
-
Click the check mark or press ENTER on your keyboard to save—seperate multiple labels by space or comma.
-
Click the X icon or press ESC on your keyboard to discard any changes.
Note: If you do not edit the Action Labels, a default label will be provided.
Step 2: Using Action Labels with Action Widgets
Creating an Action Widget with Action Labels follows the same process as creating any other Action Widget. Here’s how:
Step 2.1: create a new Action Widget
Step 2.2: edit the action trigger ("WHEN" section)
-

You’ll see the Action Labels displayed in purple text.
-
To select a label: Type the label name in the field or click the widget with the desired label.
-
Widgets without an Action Label can still be clicked, and a default Action Label will be applied.
-
For multiple Action Labels on a widget: Either click through the labels until the correct one is selected or type the specific label name in the field.
-
Step 2.3: configure the "AND IF" and "THEN" sections
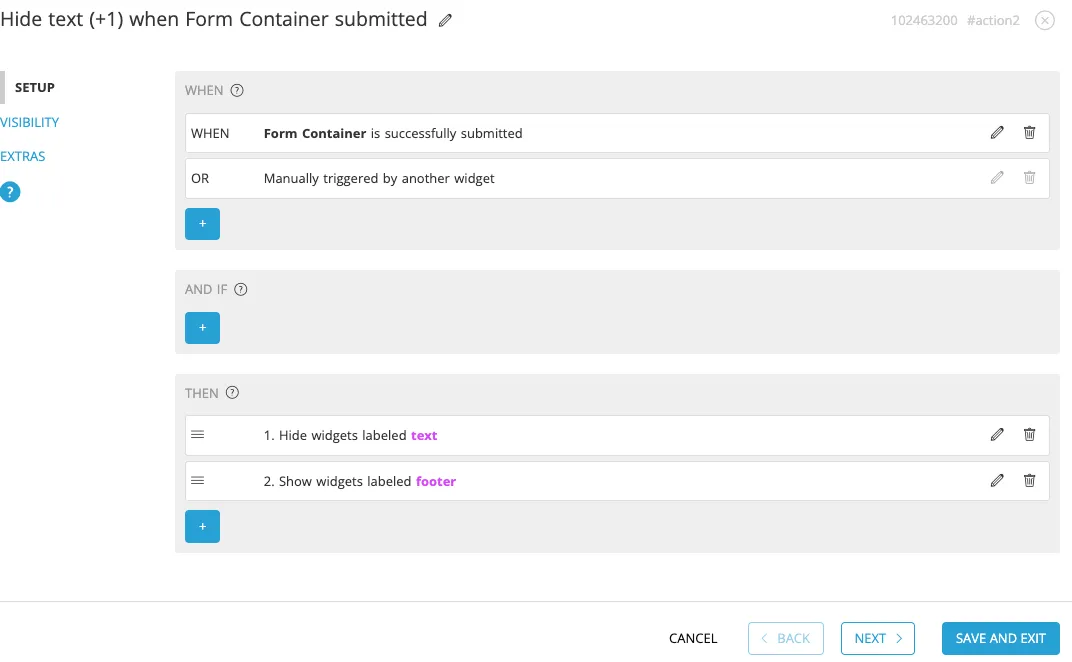
Use Action Labels as needed to configure additional conditions ("AND IF") and actions ("THEN").
Example:
-
Hide all Widgets labeled text.
-
Show all Widgets labeled footer when the form is successfully submitted.
Single-widget actions
Action Labels make intelligent selections for single-widget actions when multiple widgets share the same label. The system prioritizes widgets based on relevance to the action (e.g., visibility settings), parent visibility, and proximity to the Action Widget. This ensures predictable behavior for actions like “Pop up,” “Submit Form,” and “Scroll To.” Additionally, actions like “Set Field Value” and “Video Stop” now apply to all matching widgets, simplifying multi-widget interactions.
Related resources
Was this helpful?
Thanks — that helps us decide what to fix next.
Sorry this missed. Tell us what you needed and we'll get you an answer — and fix the page.